How to Localize Unity Games into Japanese Using XUnity.AutoTranslator (ReiPatcher)
While the PC gaming market features numerous ambitious indie titles from overseas, quite a few of them lack official Japanese localization. In simulation games like “Airship: Kingdoms Adrift"—which is the subject of this article—where trading, ship customization, and complex navigation systems intertwine, the lack of language support significantly diminishes the immersion of gameplay. To comfortably play titles that do not have fan-made Japanese localization mods available, you need an environment that performs real-time machine translation of the text rendered on the game screen.
Introduction of Real-Time Machine Translation via External Tools and Differences Between the Patched and Resident Versions
This is where “XUnity.AutoTranslator" comes in handy, a tool that hooks into the rendered text of Unity games in memory and performs automated translation. There are primarily two ways to implement this tool.
- Resident Version (Mod Loader Type): A method where a mod management framework like BepInEx or MelonLoader resides in the game, operating as a plugin on top of it. While well-suited for environments using multiple mods, it increases the effort required for initial setup and installing prerequisite tools.
- Patched Version (ReiPatcher Type): A method that directly patches the game’s executable binary to embed the translation functionality. It requires no additional resident software and stands alone as a simple solution.
For this project, with the goal of “easily adding only the automatic translation feature," we selected the patched version (ReiPatcher), which can be implemented with minimal steps without increasing unnecessary resident software.
Verification Points for Epic Games Launcher Operation and Display Delay
We targeted the Epic Games version of “Airship: Kingdoms Adrift." There were two key points to check upon implementation:
- Whether the patch remains intact and automatic translation functions properly even when launching the game from the Epic Games Launcher.
- The display time lag and font application status associated with real-time machine translation, specifically how much API communication latency affects the gameplay feel.
ReiPatcher Installation Procedure and Editing Config.ini
The installation procedure follows a flow of placing files, applying the patch, and rewriting the configuration file.
Placing Required Files and Applying the Patch
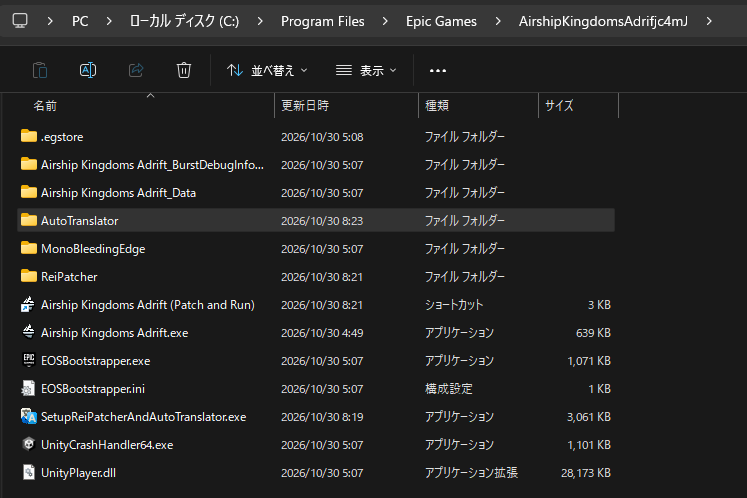
Download the XUnity.AutoTranslator-ReiPatcher ZIP file from the GitHub distribution page.
Extract the ZIP file and copy its contents directly into the folder where the game’s executable file (.exe) resides.
After placing the files, run SetupReiPatcherAndAutoTranslator.exe located inside the folder. A command prompt window will open, and the patching process for the game files will run automatically. Once completed, a patched shortcut will be generated. Launch the game once from that shortcut to confirm that the configuration folder and initial files have been generated, then exit the game.
Configuring Config.ini
Open AutoTranslator/Config.ini generated within the game folder using a text editor, and specify the translation engine, language, and fonts.
[Service]
Endpoint=GoogleTranslateV2

[General]
Language=ja
FromLanguage=en

[Font]
OverrideFontTextMeshPro=Meiryo
FallbackFontTextMeshPro=Meiryo
OverrideFont=Meiryo
FallbackFont=Meiryo

[Behaviour]
MaxCharactersPerTranslation=2500
EnableAsync=True
- Endpoint: Specified GoogleTranslateV2, which is easy to use without requiring API key registration work.
- Language / FromLanguage: Set the source language to English (en) and the target language to Japanese (ja).
- Font: Specified the Windows standard Meiryo font for the display font.
- MaxCharactersPerTranslation: Relaxed the character limit per request to prevent long texts from being cut off.
- EnableAsync: By setting it to True, translation communication is processed asynchronously in the background, suppressing rendering stutter during communication.
Useful Shortcut Keys (Hotkeys) During Gameplay
XUnity.AutoTranslator incorporates shortcut keys that allow you to control translation behavior via keyboard operations during the game. In particular, the following three are used frequently during gameplay:
- Alt + T: Instantly switch between translated text and original text (English). This allows you to check the original text with a single touch when the meaning of the machine translation is difficult to grasp.
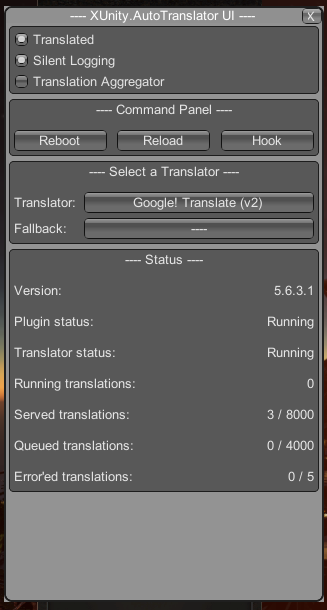
- Alt + 0: Show/hide the AutoTranslator GUI menu screen. Allows you to select translators and check status.

- Alt + R: Reload translation cache files. You can instantly reflect translations corrected in an external editor into the game while keeping the game running.
Operation Verification on Actual Hardware and Display Lag Specifications
After completing the configuration, we launched the game from the Epic Games Launcher to verify its operation.
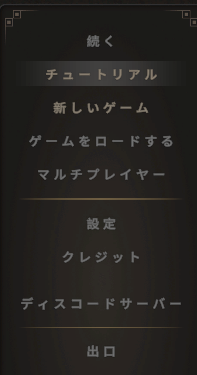
Automatic translation functioned properly simply by starting the game from the Epic Games Launcher without going through the dedicated shortcut. By specifying Meiryo for the font, no garbled characters occurred at all, and the UI was displayed in highly legible Japanese.
For text displayed for the first time, the behavior is that it switches to Japanese with a delay of about 1 to 2 seconds after English appears on the screen. This is because communication processing with Google Translate is performed in the background. Once translated, text is automatically accumulated in the local cache file within the local folder (AutoTranslator/Translation/ja/Text/_AutoGeneratedTranslations.txt). When the same text is displayed for the second time or later, no communication occurs, so it is rendered in Japanese immediately without delay.
Additionally, if there are unnatural translations in technical terms or character names, you can directly edit the text file mentioned above and press Alt + R on the game screen to instantly reflect the corrected translations without restarting the game. Furthermore, whenever you encounter sentences that are difficult to understand, you can instantly revert to the original English display just by pressing Alt + T to check, minimizing stress on game progression.
Conclusion
We applied the ReiPatcher version of XUnity.AutoTranslator—which does not require resident mod management software—to perform Japanese localization for “Airship: Kingdoms Adrift," which officially lacks Japanese support. The Windows standard Meiryo font was specified for fonts, and GoogleTranslateV2 was specified for the translation engine. As a result of verification, we confirmed that translation functions properly simply by launching from the Epic Games Launcher. While display lag waiting for communication occurs for text displayed for the first time, local caches accumulate for the second time and onward, rendering Japanese immediately and establishing an environment for comfortable play.
* The copyright of the in-game images of “Airship: Kingdoms Adrift" used in this article belongs to Revolution Industry and Freedom Games.
* The posted Japanese display screens are citations for operation verification purposes applying unofficial machine translation by an external tool (XUnity.AutoTranslator).