Publishing a Web Server in an Apartment Network Using WireGuard and VPS (OCI)
This guide explains how to expose a Web server (OpenLiteSpeed) installed within an apartment or multi-dwelling unit (MDU) network environment by connecting it via a Virtual Private Network (VPN) to a Virtual Private Server (VPS) on Oracle Cloud Infrastructure (OCI). Access to the VPS is directly forwarded to the Web server using iptables NAT.
Architecture Diagram
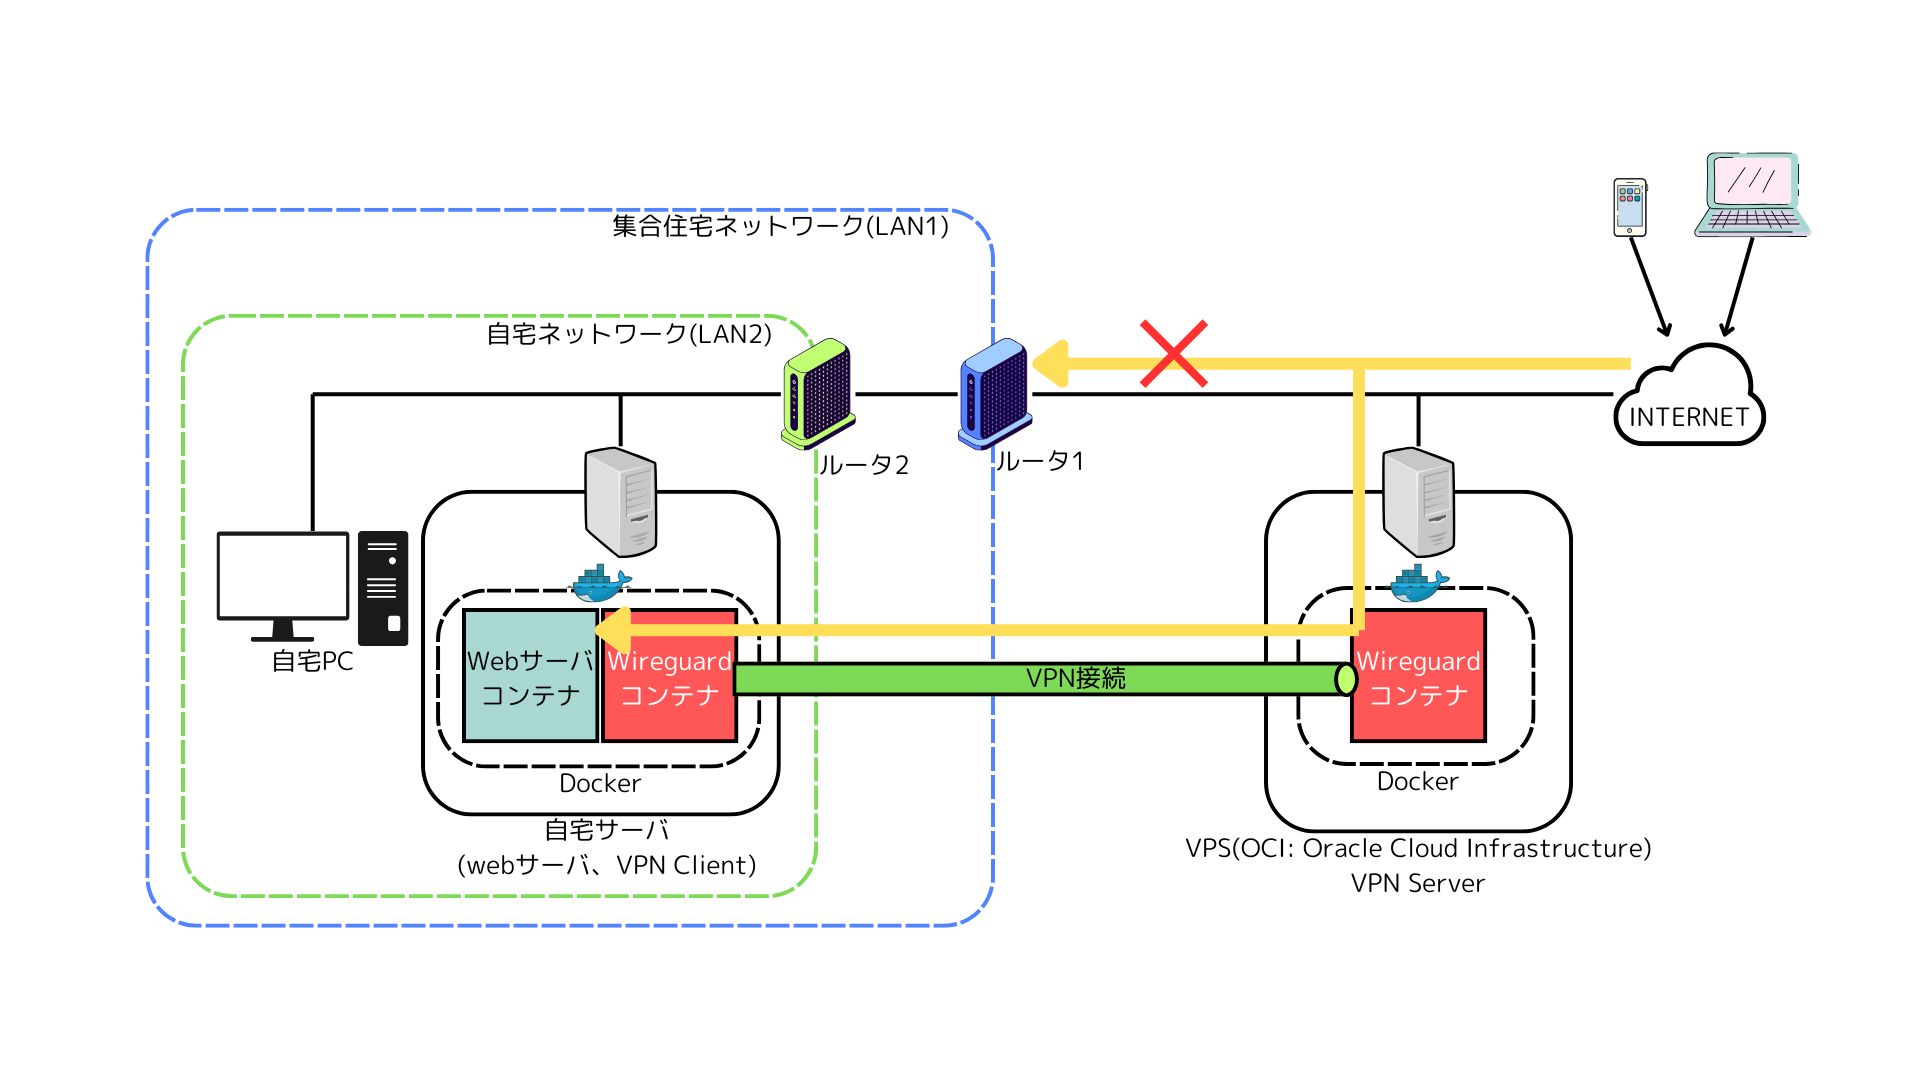
Objectives
- Expose a Web server set up inside an apartment or MDU network environment.
- Operate using free services with minimal cost possible.
- Reuse a Web server that was operated in the past.
Goal
- Directly forward access to the VPS ports 80/tcp (HTTP), 443/tcp (HTTPS), and 443/UDP (HTTP/3) to the Web server.
Challenges
- Apartments and condominiums are assigned private IP addresses, making it impossible to directly expose a Web server.
- Want to keep the cost of exposing a Web server down.
- Need to consider how to utilize the Web server used before moving in the new environment.
Building a VPN (Virtual Private Network)
A VPN (Virtual Private Network) is a technology that establishes a virtual private line over the internet to enable secure communication. Using a VPN allows networks in distant locations to connect via an encrypted communication path, reducing the risk of third parties snooping on data.
Main use cases include the following:
- Remote Access: Securely access the corporate network or home server from outside
- Site-to-Site Connection: Connect networks in different locations via VPN to operate them as a single network
- Enhanced Security: Encrypt data communication even in unsecured environments like public Wi-Fi
This article explains how to expose a Web server in an apartment using a VPN. To achieve this, we will build a VPN utilizing “WireGuard", a lightweight and high-speed VPN protocol.
What is WireGuard?
WireGuard is a simple and high-performance VPN protocol with the following features:
- High Speed: Lower processing overhead and faster communication compared to traditional VPNs (IPsec and OpenVPN)
- High Security: Adopts modern cryptographic technology for strong safety
- Simple Configuration: Eliminates complex settings, making setup easy
This article will detail how to introduce WireGuard to an Oracle Cloud Infrastructure (OCI) VPS and establish a VPN connection with the Web server in the apartment.
WireGuard Network Configuration
WireGuard uses two types of networks.
- Communication network between WireGuard peers
- A network for VPN peers to communicate within the WireGuard tunnel.
- Example:
10.1.232.0/24
- Network for machines inside the WireGuard network
- IP addresses assigned to each machine inside the VPN.
- Example:
192.168.100.0/24
WireGuard uses the following ports.
- Ports for communicating with the WireGuard Server
- Ports used when creating the WireGuard tunnel
- Example:
51820/UDP(customizable)
VPS Configuration
To use a VPS (Oracle Cloud Infrastructure, OCI) as a WireGuard relay node to securely communicate with your home server, the following conditions must be met:
- A Public IP must be assigned to the VPS
- OCI free tier instances assign public IPs by default, but verification is required.
- You can check the public IP from “Instance Details" in the OCI Console.
-
Open necessary ports in the firewall (OCI Security List)
- WireGuard communication (UDP port 51820)
- For Web server (TCP 80, 443)
- HTTP/3 (UDP 443)
WireGuard-Server Configuration
Run WireGuard-Server as a Docker container on the VPS.
Environment Variable Settings in docker-compose.yml
docker-compose.yml:
version: '3'
services:
  wireguard:
    image: linuxserver/wireguard
    container_name: wireguard-server
    cap_add:
      - NET_ADMIN
      - SYS_MODULE
    environment:
      - PUID=1000
      - PGID=1000
      - SERVERURL= <IP OR DOMAIN> #optional
      - SERVERPORT=51820 #optional
      - PEERS=1 #optional
      - PEERDNS=8.8.8.8,10.1.232.1 #optional
      - INTERNAL_SUBNET=10.1.232.0/24 #optional
      - ALLOWEDIPS=10.1.232.0/24 #optional
      - PERSISTENTKEEPALIVE_PEERS=all #optional
      - LOG_CONFS=true #optional
      - SERVER_ALLOWEDIPS_PEER_1=192.168.100.0/24
    volumes:
      - ./config:/config
   - /lib/modules:/lib/modules #optional
     ports:
      - 80:80
      - 443:443
      - 443:443/udp
      - 51820:51820/udp
    restart: unless-stopped
    sysctls:
      - net.ipv4.conf.all.src_valid_mark=1
Running docker-compose up -d automatically generates WireGuard configuration files and related data inside the config directory. The directory structure will look like this. Since PEERS is set to “1" in docker-compose.yml, peer “1" is created in the config directory. If creating multiple peers, separate them with commas.
$ls -R configconfig/: coredns peer1 server templates wg_confs config/coredns: Corefile config/peer1: peer1.conf peer1.png presharedkey-peer1 privatekey-peer1 publickey-peer1 config/server: privatekey-server publickey-server config/templates: peer.conf server.conf config/wg_confs: wg0.conf
WireGuard-Client Configuration
Run WireGuard-Client as a Docker container on your home server.
Configuring wg0.conf
Create wg0.conf by referencing config/peer1/peer1.conf from the WireGuard-Server.
[Interface]
Address = 10.1.232.2/24
PrivateKey = <Client private key: copied from peer1.conf>
ListenPort = 51820
DNS = 8.8.8.8,10.1.232.1

[Peer]
PublicKey = <Server public key: copied from peer1.conf>
PresharedKey = <Preshared key: copied from peer1.conf>
Endpoint = <VPS IP address or domain>:51820
AllowedIPs = 10.1.232.0/24
PersistentKeepalive = 25
Adding PostUp / PostDown to Interface in wg0.conf
To apply NAT rules when WireGuard starts, add PostUp and PostDown to [Interface] in the WireGuard client’s wg0.conf.
PostUp = iptables -t nat -A POSTROUTING -d 192.168.100.0/24 -j MASQUERADE
PostDown = iptables -t nat -D POSTROUTING -d 192.168.100.0/24 -j MASQUERADE
Adding Web Server (OpenLiteSpeed) to the WireGuard Network
Use Docker networks to specify the OpenLiteSpeed IP (e.g., 192.168.100.3).
Network Settings in docker-compose.yml
services:
  openlitespeed:
    image: litespeedtech/openlitespeed
    container_name: openlitespeed
    networks:
      backbone:
        ipv4_address: 192.168.100.3
      ...
      [Middle omitted]
      ...

networks:
  backbone:
    driver: bridge
    ipam:
      config:
        - subnet: 192.168.100.0/24
iptables Configuration on WireGuard-Server
Configure iptables on the WireGuard-Server to forward VPS HTTP/HTTPS traffic to OpenLiteSpeed on your home server. Rewrite PostUp/PostDown in config/wg_conf/wg0.conf as follows. (Initial values of PostUp/PostDown are written in a single line, but split here for better readability.)
PostUp = iptables -A FORWARD -i %i -j ACCEPT
PostUp = iptables -A FORWARD -o %i -j ACCEPT
PostUp = iptables -t nat -A POSTROUTING -o eth+ -j MASQUERADE
PostUp = iptables -A FORWARD -i %i -o %i -j ACCEPT
PostUp = iptables -t nat -A POSTROUTING -d 10.1.232.0/24 -j MASQUERADE
PostUp = iptables -t nat -A PREROUTING -i eth+ -p tcp --dport 80 -j DNAT --to-destination 192.168.100.3:80
PostUp = iptables -t nat -A PREROUTING -i eth+ -p tcp --dport 443 -j DNAT --to-destination 192.168.100.3:443
PostUp = iptables -t nat -A PREROUTING -i eth+ -p udp --dport 443 -j DNAT --to-destination 192.168.100.3:443
PostDown = iptables -D FORWARD -i %i -j ACCEPT
PostDown = iptables -D FORWARD -o %i -j ACCEPT
PostDown = iptables -t nat -D POSTROUTING -o eth+ -j MASQUERADE
PostDown = iptables -D FORWARD -i %i -o %i -j ACCEPT
PostDown = iptables -t nat -D POSTROUTING -d 10.1.232.0/24 -j MASQUERADE;
PostDown = iptables -t nat -D PREROUTING -i eth+ -p tcp --dport 80 -j DNAT --to-destination 192.168.100.3:80
PostDown = iptables -t nat -D PREROUTING -i eth+ -p tcp --dport 443 -j DNAT --to-destination 192.168.100.3:443
PostDown = iptables -t nat -D PREROUTING -i eth+ -p udp --dport 443 -j DNAT --to-destination 192.168.100.3:443$ ls -R config/
Operation Verification
- Check WireGuard connection
docker exec -it <wireguard container name> wg show - Verify if you can access the home server’s Web server from the VPS
docker exec -it <wireguard container name> curl -I http://192.168.100.3 - Verify if you can access the Web server from the internet using the VPS domain
curl -I https://your-vps-domain.com
Conclusion
With this configuration, we successfully exposed the Web server inside the apartment network by relaying through a VPS. Utilizing WireGuard made it possible to securely and flexibly forward traffic, enabling external access.