Let’s Play with the RP2040-zero and WS2812 LEDs
In recent years, the RP2040 series has been attracting attention as an easy-to-use microcontroller. In this post, we will introduce how to light up the onboard RGB LED (WS2812) using the RP2040-zero, a compatible board. The RP2040-zero can be obtained on AliExpress for just a few hundred yen, making it a low-cost option that can be utilized for a wide variety of projects.
Features of the RP2040-zero
- Inexpensive Compatible Board: It is equipped with the same RP2040 chip as the Raspberry Pi Pico, but costs only a few hundred yen. I bought a compatible board on AliExpress, but it is also available on Amazon.
- Difference in Onboard LEDs: It does not have the GP25 LED found on the Raspberry Pi Pico. Instead, an RGB LED called WS2812 is mounted on the board.
Pin Assignment
The RP2040-zero has the following pin configuration, allowing for flexible wiring depending on your application.
-
-

Pin assignment of the RP2040-zero clone Access from the Top Side:
- Power Supply: 5V, GND, 3.3V
- GPIO: A total of 20 GPIO pins are accessible. Each GPIO pin supports digital input/output as well as diverse functions such as PWM, SPI, and I2C.
- WS2812: The LED assigned to GPIO 16.
-
Features of the Bottom Side:
-
Additional pad terminals are provided on the bottom side.
-
GPIO: A total of 9 GPIO pins are accessible. Since these are pad terminals, using them effectively might be a bit tricky.
-
-
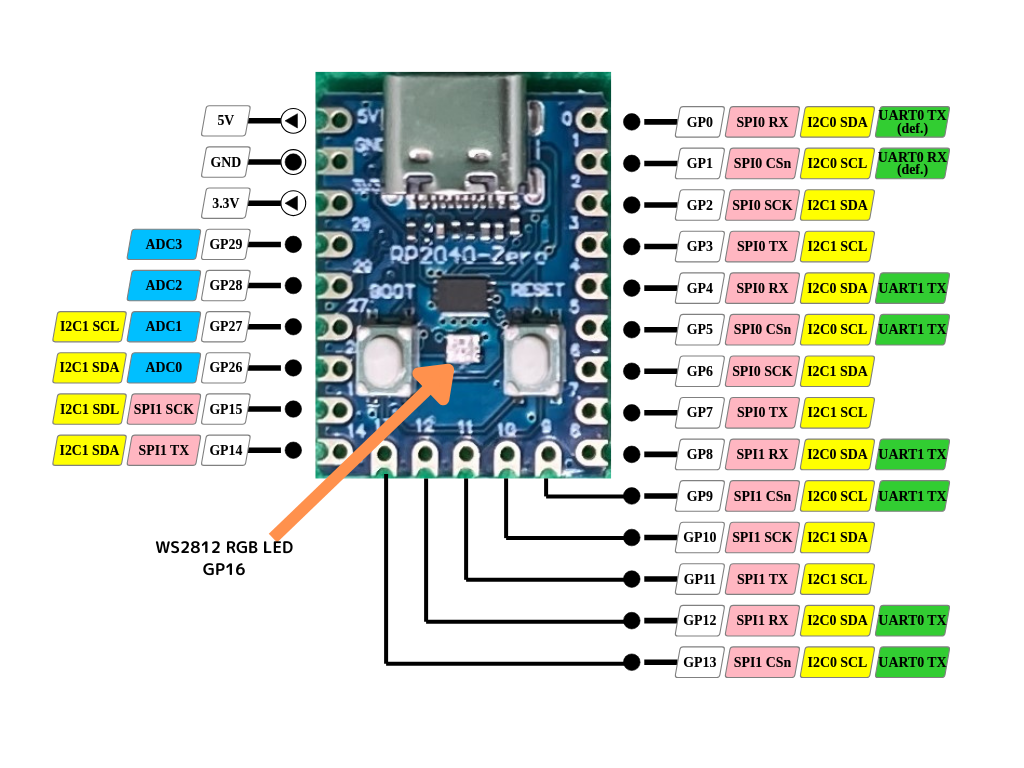
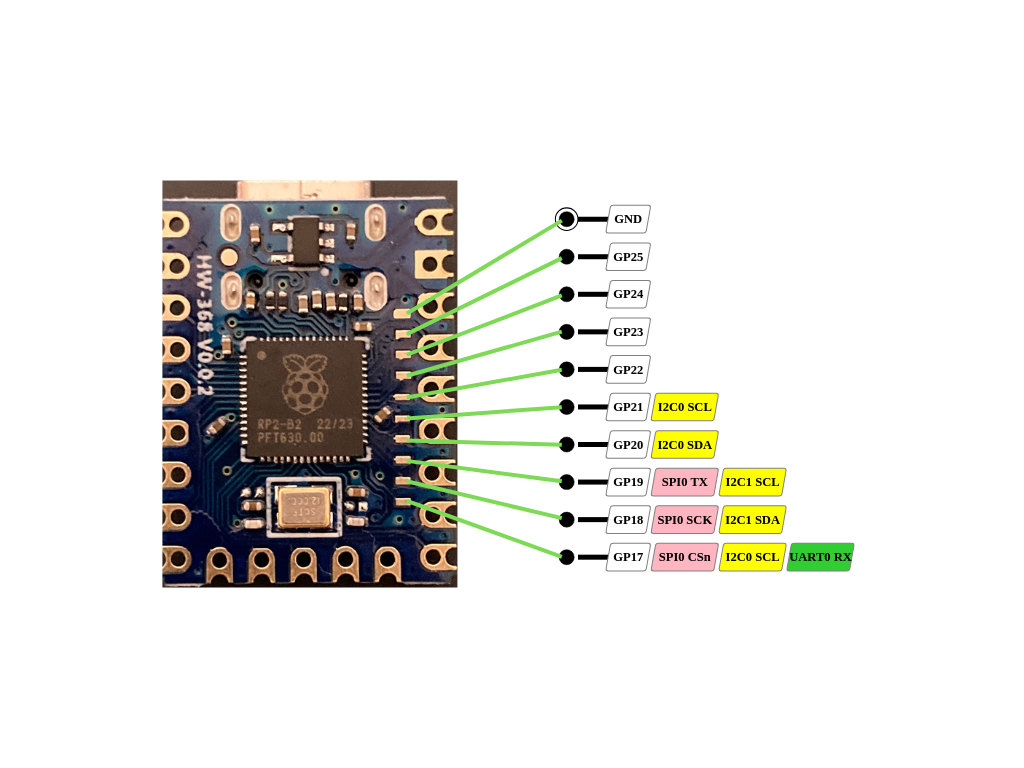
This pin assignment is what makes the RP2040-zero so appealing, allowing it to handle multifunctional projects despite its limited board size.
How to Control WS2812 LEDs
WS2812s are popular as individually controllable RGB LEDs. Upon investigation, I found that there are many libraries available for WS2812, such as benevpi’s pico_python_ws2812b. However, you can actually control WS2812 LEDs sufficiently just by using the neopixel library built into MicroPython.
Setting Up the Environment
I plan to explain how to install Thonny and the initial setup of the RP2040-zero in detail in another post. For this time, we will proceed under the assumption that your environment is already set up.
Code Example: Blinking the LED
The following code is a sample for blinking the WS2812 LED. The code uses the LED connected to GPIO 16 and repeats turning the LED on and off every 500 milliseconds.
from machine import Pin
import neopixel
import time

n = neopixel.NeoPixel(Pin(16), 1)

while True:
    n[0] = (0,8,8)
    n.write()
    time.sleep_ms(500)
    n[0] = (0,0,0)
    n.write()
    time.sleep_ms(500)
Key Points of the Code
- Pin Designation: Since the Raspberry Pi Pico’s GP25 is not present, the RP2040-zero uses GPIO 16.
- Utilizing the neopixel Library: By using the library built into MicroPython, you can control the WS2812 LED without introducing additional libraries.
- Loop Processing: Blinking is achieved by repeatedly turning the LED on and off within an infinite loop.
Conclusion
The RP2040-zero is inexpensive, easy to obtain, and makes an ideal board as an entry point for projects. By utilizing the built-in WS2812 LED and MicroPython’s neopixel library, you can easily control LEDs. Moving forward, I plan to introduce Thonny settings and other application examples in detail.