How to Implement Multi-Hop Port Forwarding in SSH via a One-Liner Command and Configuration File
In secure network environments, SSH port forwarding is extremely useful for safely accessing internal servers. When you need to reach a destination by hopping through multiple servers, it traditionally required combining multiple SSH commands. In this article, we will introduce how to simply achieve multi-hop port forwarding using advanced SSH features, either with a single-line command or through settings in ~/.ssh/config.
Network Architecture
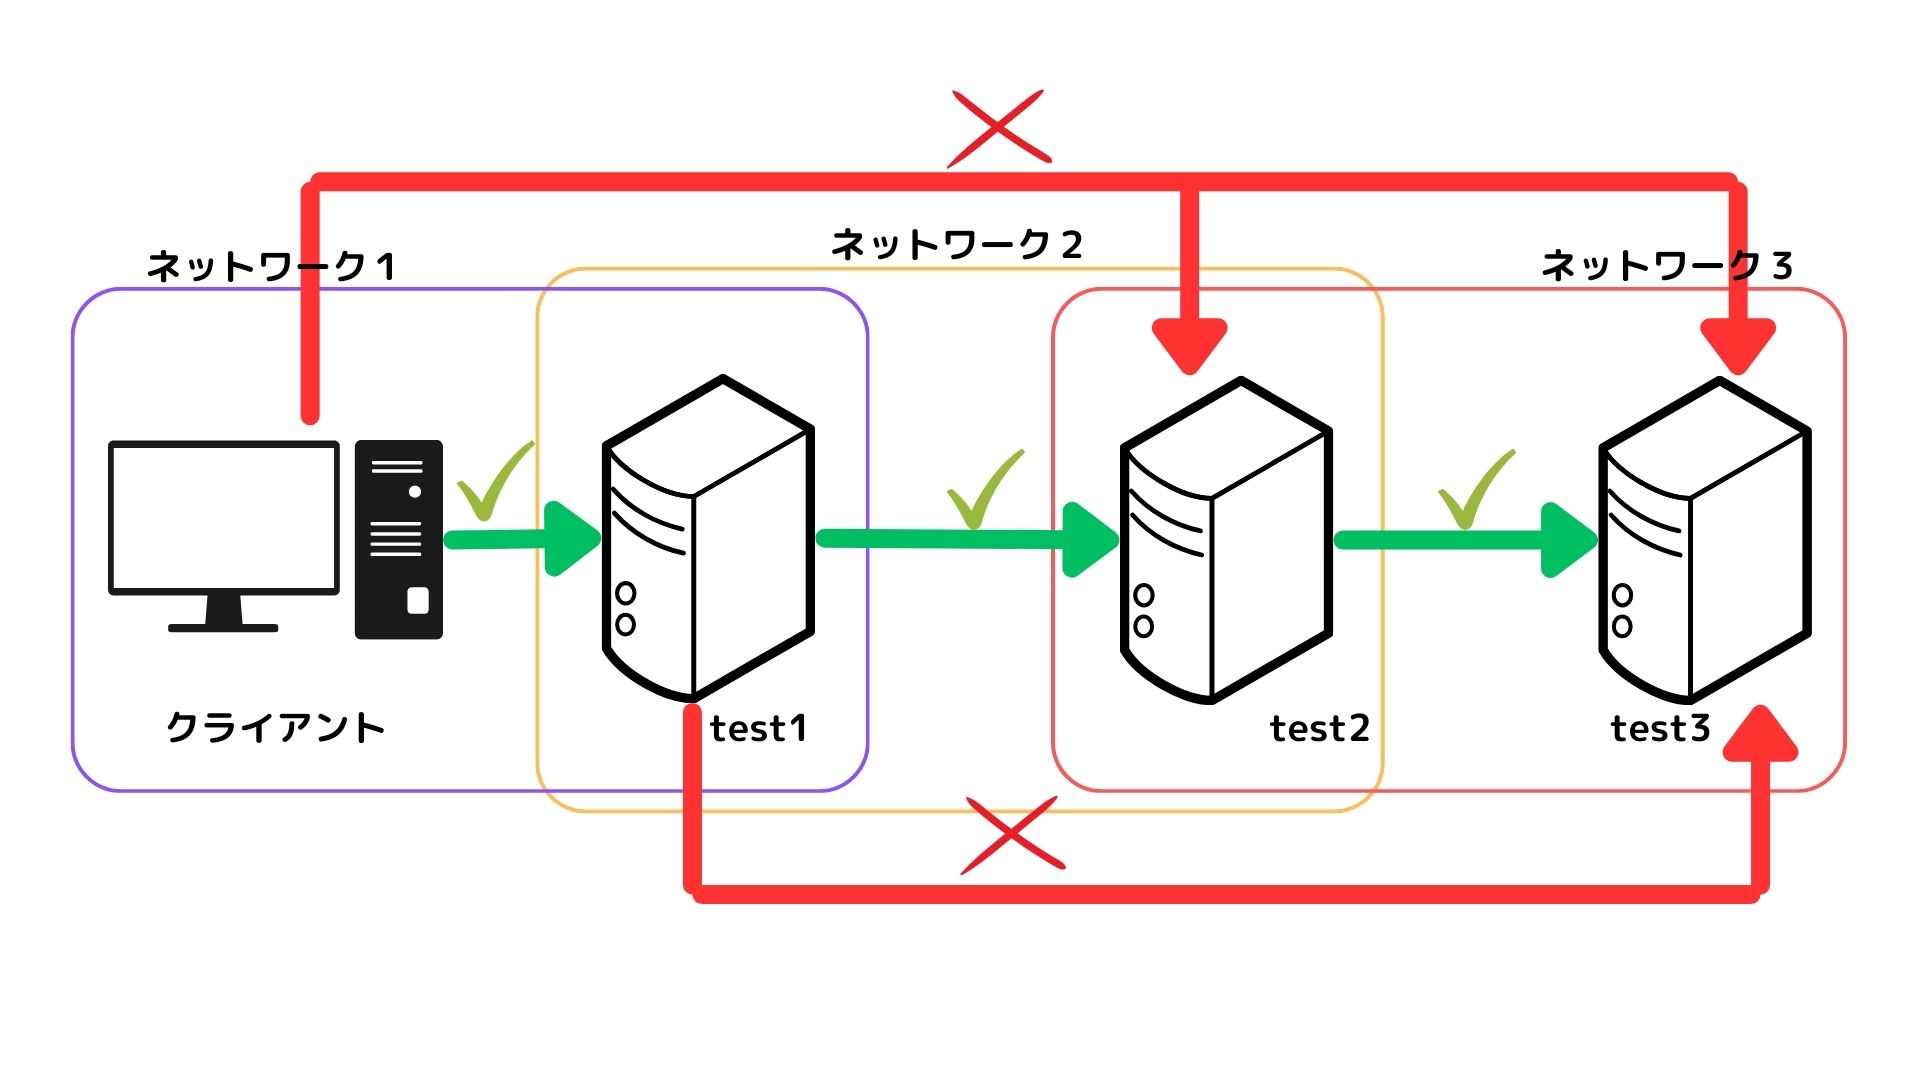
We assume the following network environment.
-
Client PC: Cannot directly access test2 or test3.
-
test1 Server: Accessible from the client PC, but cannot directly access test3.
-
test2 Server: Accessible from test1, and can access test3.
-
test3 Server: The server you ultimately want to connect to via RDP.
The Challenge
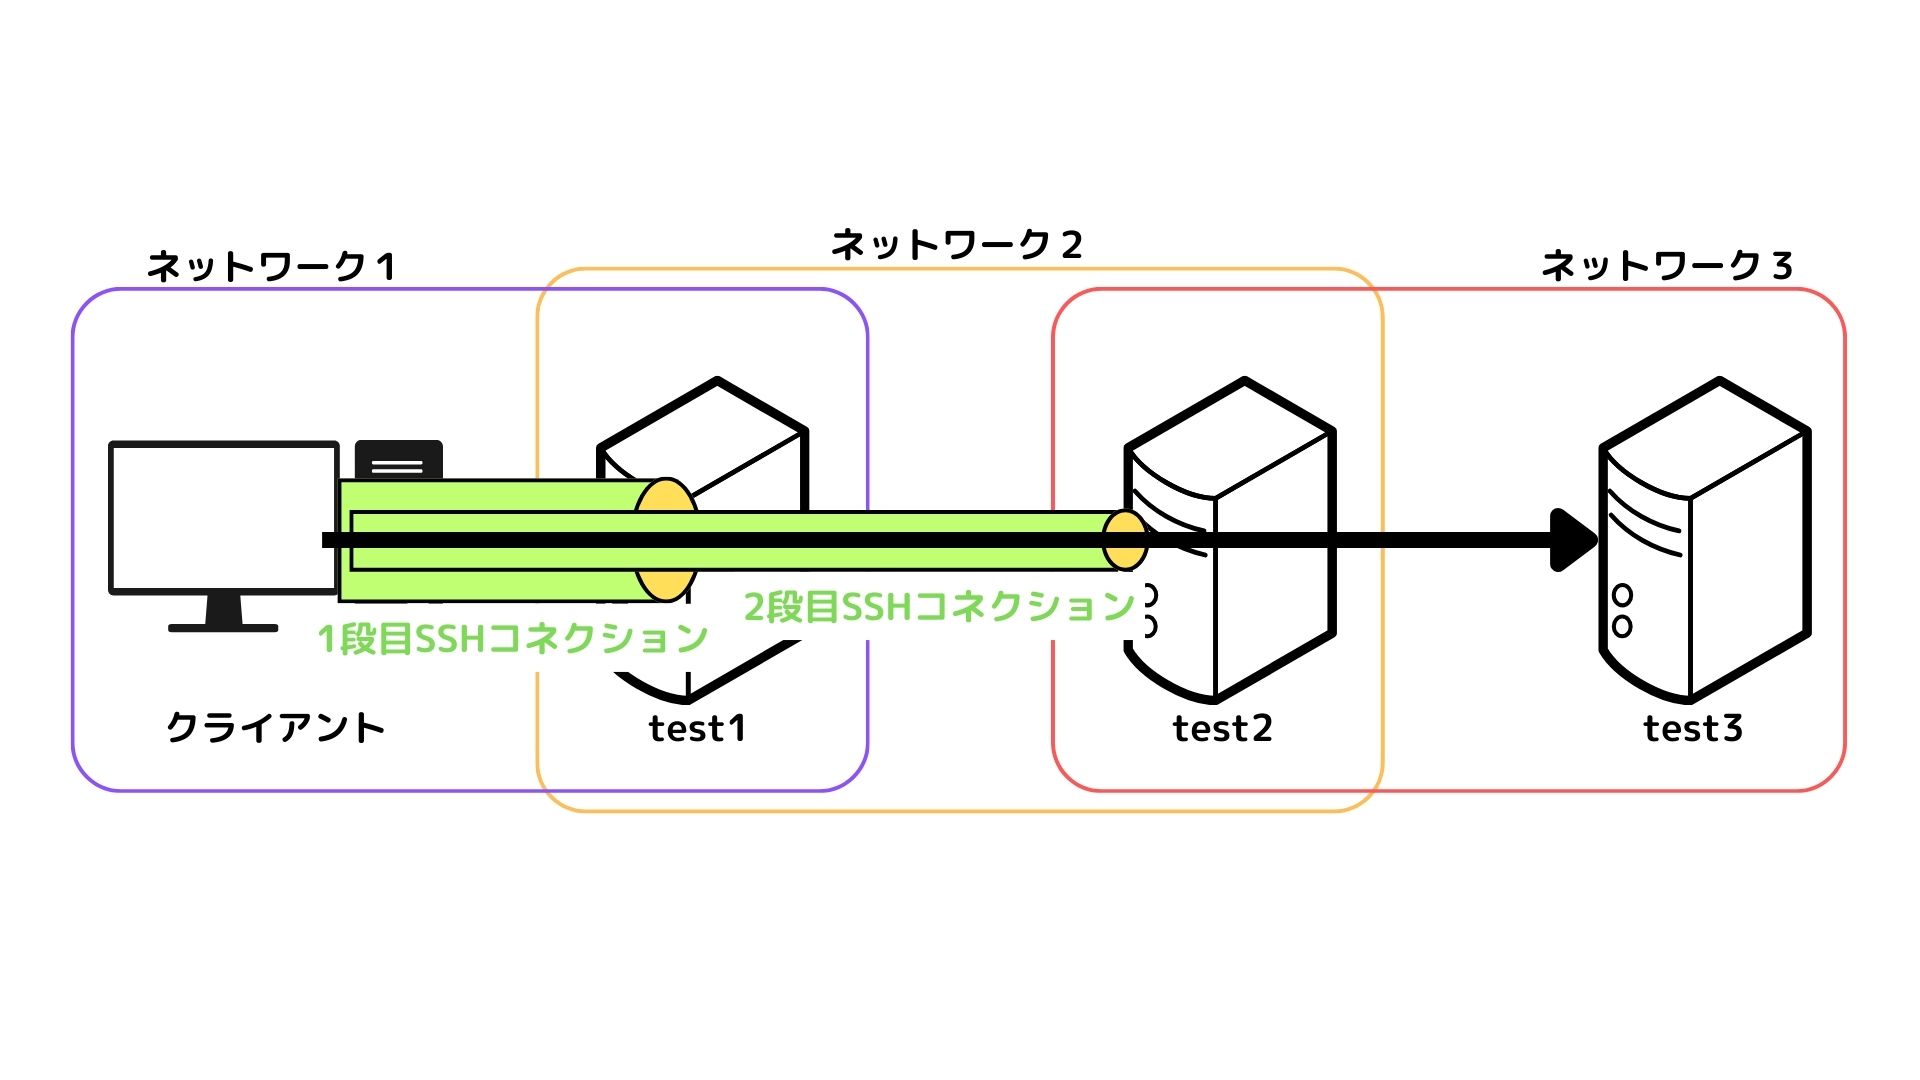
Let’s consider a case where there are two stages of port forwarding configuration.
-
Example of connecting to test2 via a bastion host (test1) and securing a local port
ssh -L 10022:test2.example.com:22 user1@test1.example.com
→ Maps the SSH port of test2 to local port 10022 via test1.
-
Example of forwarding to the RDP port of test3 via test2
ssh -L 13389:test3.example.com:3389 user2@localhost -p 10022
→ Connects to local port 10022 and further forwards traffic from test2 to port 3389 on test3.
With this setup, commands must be executed at each stage, which is cumbersome in terms of management and automation. Furthermore, in proxy environments, it was necessary to prepend a backslash (\\) to the hostname to ensure that DNS resolution for test3.example.com was performed on the connection target (test2) side.
Achieving It with a One-Liner Command
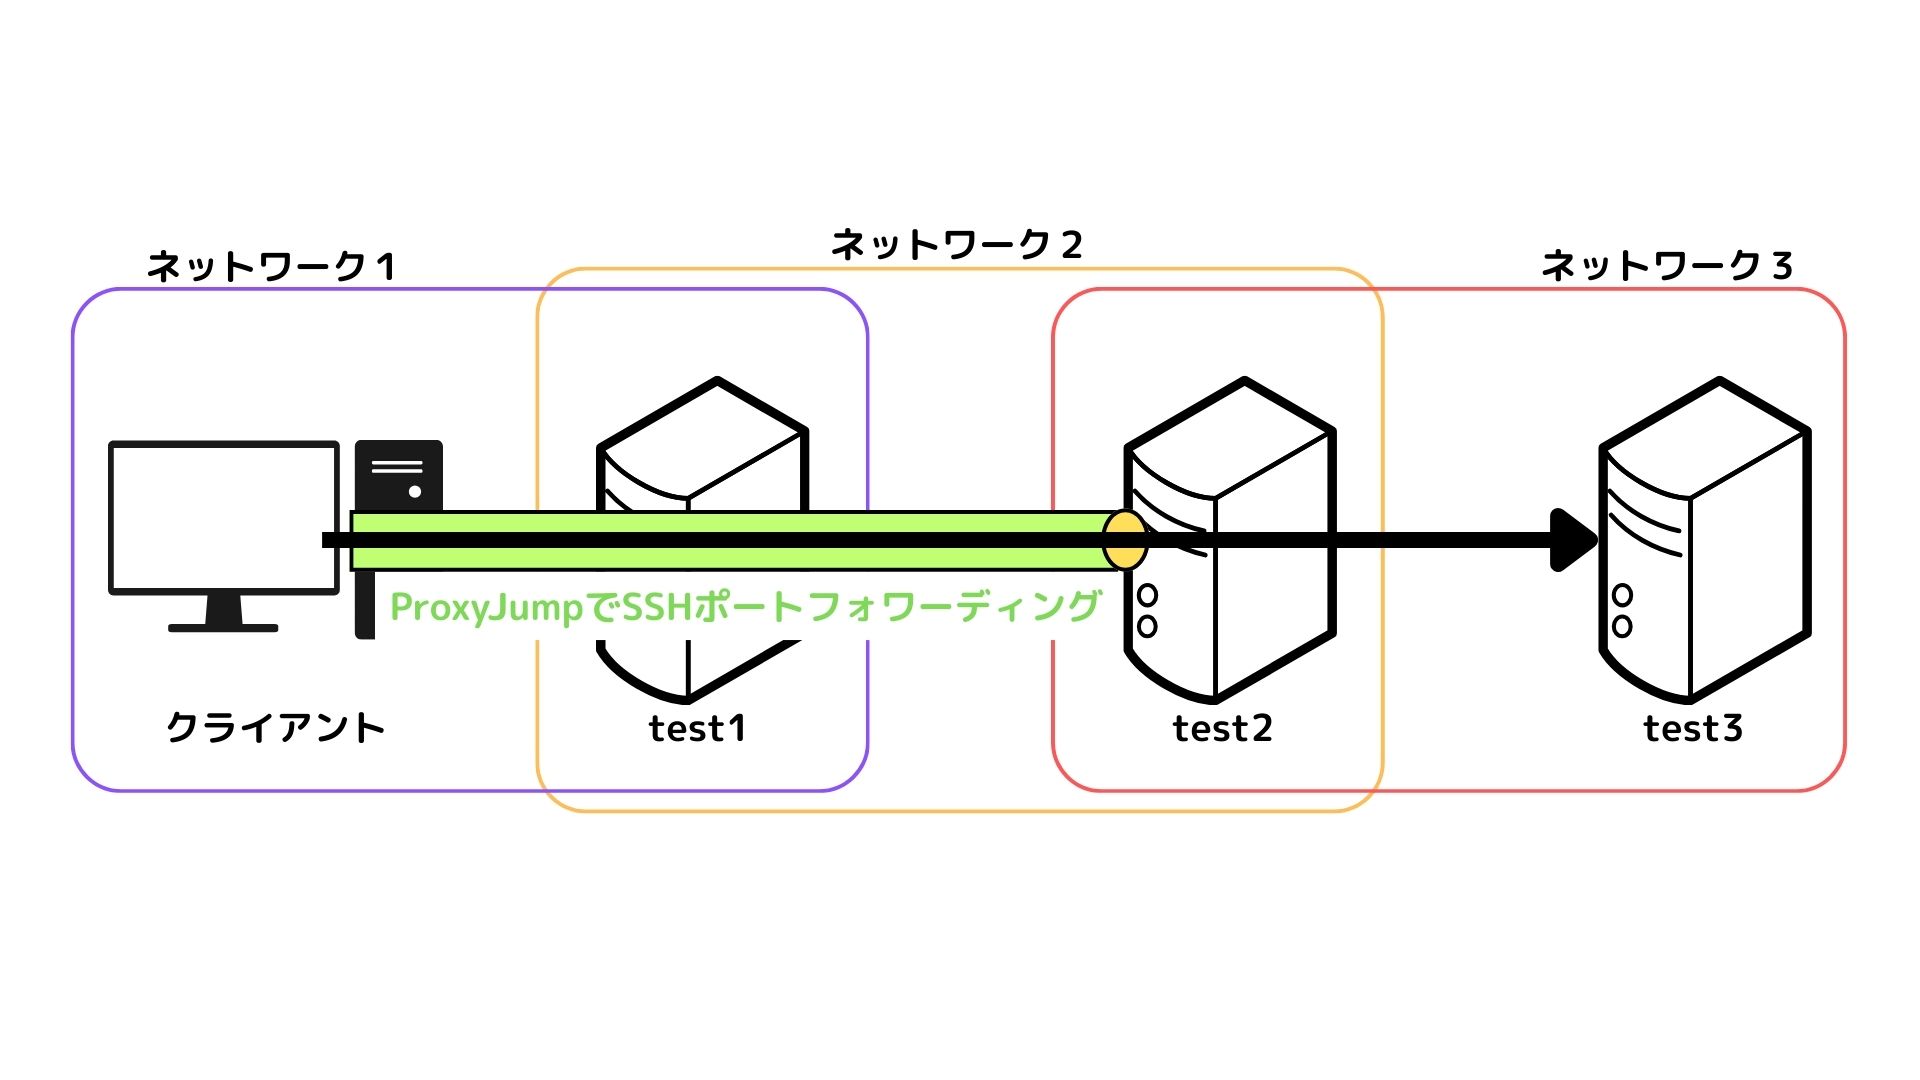
By combining SSH’s ProxyJump and LocalForward options, you can accomplish the above procedure in a single SSH command. A specific command example is shown below.
ssh -J user1@test1.example.com user2@test2.example.com -L 13389:\\test3.example.com:3389
Explanation of Command Options
-
-J user1@test1.example.com
→ First connects totest1.example.com(the bastion server) asuser1, and jumps from there to the next host. -
user2@test2.example.com
→ The final destination host istest2.example.com, where authentication is performed asuser2. -
-L 13389:\\test3.example.com:3389
→ Local port 13389 is forwarded on the test2 side to\\test3.example.com:3389. By prepending a backslash (\\) here, DNS resolution fortest3.example.comis performed on test2, allowing you to successfully reach the destination even in a proxy environment.
Executing this as a one-liner simplifies multiple SSH connections and port forwarding settings, making it easy to incorporate into scripts.
Configuring in ~/.ssh/config
By writing the same connection configuration into your SSH configuration file, you can simply run the command as ssh test3rdp. Here is a configuration example:
# Connection settings for the bastion server (test1)
Host test1
    HostName test1.example.com
    User user1

# Connection settings for the relay server (test2)
Host test2
    HostName test2.example.com
    User user2
    ProxyJump test1

# Settings for the final RDP connection (test3rdp)
Host test3rdp
    HostName test2.example.com
    User user2
    ProxyJump test1
    LocalForward 13389 \\test3.example.com:3389

# Without separate bastion server connection entry
Host test3rdp2
    HostName test2.example.com
    User user2
    ProxyJump user1@test1
    LocalForward 13389 \\test3.example.com:3389
Key Points of the Configuration
-
Host test1 and test2
→ Sets up the information for the bastion server (test1) and the relay server (test2) individually. The test2 configuration explicitly states to connect via test1 usingProxyJump. -
Host test3rdp
→ This is the entry for actually performing the RDP connection, whereHostNameis set totest2.example.com.
→ By prepending a backslash to theLocalForwarddestination, name resolution fortest3.example.comis performed on the test2 side.
By writing such settings into ~/.ssh/config, you can achieve fully automated connections from the command line simply by typing:
ssh test3rdp
Benefits of This Method
-
Simplicity: Complex port forwarding configurations can be consolidated into a single-line command or a simple config entry, making management effortless.
-
Flexibility: Even in connection environments traversing multiple servers, authentication credentials and detailed transfer settings for each server can be specified individually, facilitating easier troubleshooting.
-
Easy Automation: Simple to incorporate into scripts and routine tasks, streamlining remote environment access.
Conclusion
By utilizing advanced SSH options, we were able to consolidate multi-stage port forwarding configurations into a single-line command or an entry in ~/.ssh/config. Even in proxy environments or complex network architectures, controlling the timing of name resolution allows for simpler and safer connections. We hope this article helps improve the efficiency of your SSH configurations.