No Custom Domain Required! A Practical Guide to “Proxy Authentication” for Using the Gmail API on a Private Server
Suppose you want to call the Gmail API from an application running on a server within your home LAN (192.168.x.x). When attempting this, the biggest hurdle you will face is OAuth 2.0 authentication.
Under Google’s strict security policies, specifying a private IP address for the URL (redirect URI) used to receive the “pass (authorization code)" after authentication is not permitted. Typically, this requires a combination of a “publicly accessible domain" and a “valid SSL certificate (HTTPS)."
However, exposing a self-hosted server to the public internet and opening ports poses significant security risks, and many users do not own a custom domain. In this article, we will explain how to solve this issue using a standard technology called SSH port forwarding (SSH tunnel) to complete authentication safely and at zero cost.
Why Local DNS or Hosts Files Won’t Work
You might be thinking, “Won’t it work if I just write my-server.local in my hosts file?" However, Google OAuth enforces a very strict “HTTPS mandate":
- Rule: The redirect destination must always be HTTPS.
- Exception: Unencrypted HTTP communication is permitted solely for loopback addresses (localhost or 127.0.0.1).
Even if name resolution succeeds within your local network, attempting to communicate via HTTP with any domain name other than localhost (e.g., n8n.local) will result in a Google-side error and be rejected. For this reason, the approach of “typing localhost into the browser and forwarding only the payload to the server" is the only viable standard method in a domain-less environment.
How Authentication Works: A Bucket Brigade via “Proxy"
In this method, your workstation acts as a “proxy for the server" to interact with Google.
- Trigger: An application on the server (such as n8n) sends a signal to “start authentication."
- Interaction: You log in to Google using the browser on your workstation and click the approval button.
- Receipt: Google sends the pass to http://localhost:5678 (your own PC).
- Forwarding: The SSH tunnel intercepts this communication and instantly delivers it to the home server’s port.
- Enable the API: Enable the “Gmail API."
- OAuth Consent Screen: Select “External" for the User Type.
- [CRUCIAL] Register Test Users:
- Be sure to add (+ ADD USERS) the Gmail address you want to link with n8n to the “Test users" section located in the middle of the consent screen settings. If you have multiple addresses, add all of them.
- Attempting to link an address not registered here will result in rejection with the error: “App hasn’t been verified by Google (Error 403)."
- Go to “APIs & Services" > “Enabled APIs & services" > “+ Enable APIs and Services" > “Gmail API"
- Click the Enable button
- Access the Google Cloud API Console
- Create a project
- Go to “APIs & Services" > “OAuth consent screen" > “Clients" > “+ Create Client"
- Since we are using it for a “Web application," select “Web application" when creating credentials.
- Enter the following in the Authorized redirect URIs:
- http://localhost:5678/rest/oauth2-credential/callback
- *Please adjust the port number to match the application you are using.
Once authentication is complete, a persistent key called a “refresh token" is saved on the server. With this token in place, the server can communicate with Google independently going forward, even if you close the SSH tunnel.
Practical Steps: Completing Authentication
This explanation assumes you are using an n8n server, which uses port 5678 by default, to use the Gmail API. If you are using another web server or application, please adjust the ports accordingly.
Registering Test Users (Added July 2, 2026)
⚠️ Warning from Nando Kobo: Do NOT “Publish the App" under any circumstances
There is a button at the top of the screen labeled “Push to production," but you must never click it for personal use. Because the Gmail API holds highly sensitive permissions, publishing the app triggers a hellish process of strict security reviews by Google (potentially requiring paid third-party audits). Operating with the status set to “In production" is the wrong choice for self-hosting; keep it as “Testing."
Enabling the Gmail API (Added July 2, 2026)
Creating Credentials
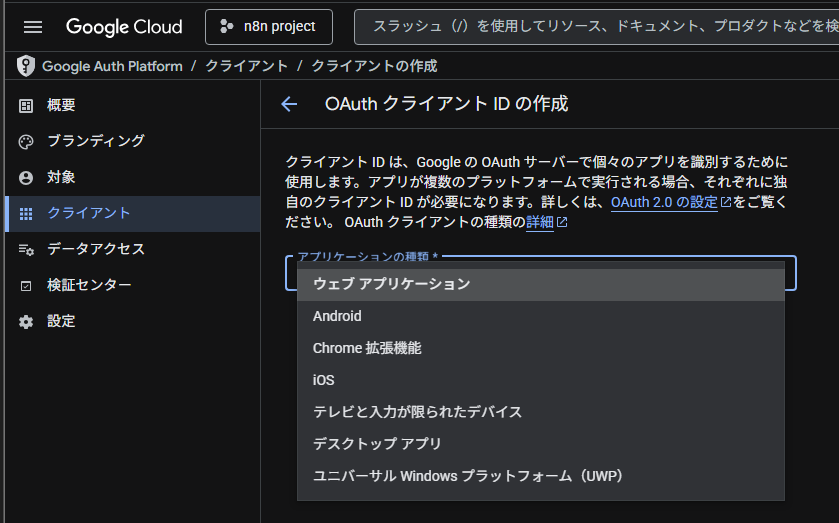 Web Application" width="839″ height="523″ srcset="https://donguri3.net/wp-content/uploads/2026/03/d7db25030a3eb4e789b8aadd9df799f3.png 839w, https://donguri3.net/wp-content/uploads/2026/03/d7db25030a3eb4e789b8aadd9df799f3-300×187.png 300w, https://donguri3.net/wp-content/uploads/2026/03/d7db25030a3eb4e789b8aadd9df799f3-768×479.png 768w, https://donguri3.net/wp-content/uploads/2026/03/d7db25030a3eb4e789b8aadd9df799f3-530×330.png 530w, https://donguri3.net/wp-content/uploads/2026/03/d7db25030a3eb4e789b8aadd9df799f3-565×352.png 565w, https://donguri3.net/wp-content/uploads/2026/03/d7db25030a3eb4e789b8aadd9df799f3-710×443.png 710w, https://donguri3.net/wp-content/uploads/2026/03/d7db25030a3eb4e789b8aadd9df799f3-725×452.png 725w, https://donguri3.net/wp-content/uploads/2026/03/d7db25030a3eb4e789b8aadd9df799f3-64×40.png 64w" sizes="(max-width: 839px) 100vw, 839px" />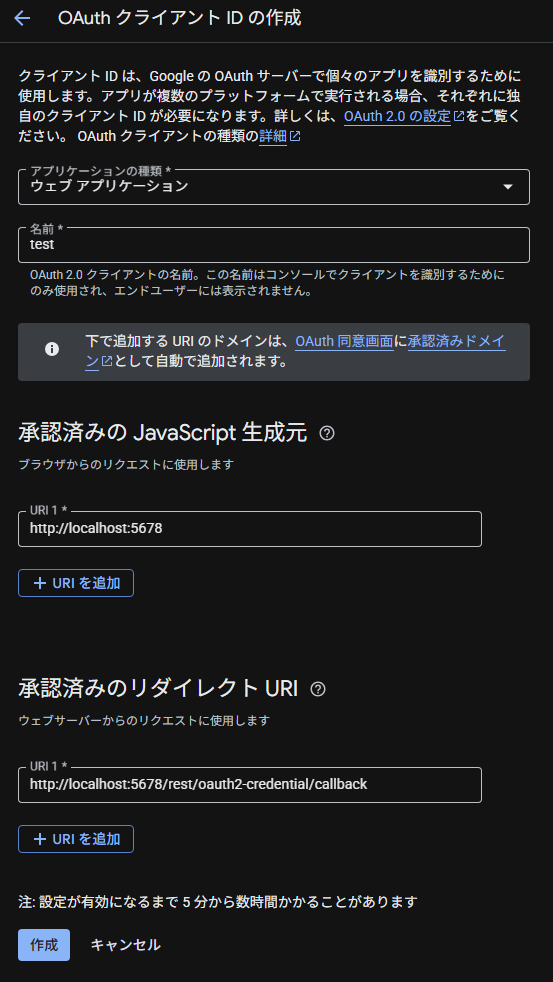
Executing SSH Port Forwarding
Open a terminal on your workstation and establish a tunnel to the server.
# Run on your workstation (Mac/Windows)
ssh -L 5678:localhost:5678 username@server_ip_address
Browser Authentication
Type http://localhost:5678 into your browser’s address bar and proceed with the authentication process. Because Google recognizes that “the developer is working on their local PC," it will safely issue an authorization code regardless of whether a domain exists.
Security Analysis: Why Is This “Recommended"?
This method is more than just a workaround.
Conclusion
There is no need to give up on API integration just because you lack a domain. By connecting a “secret passage" called SSH to the sole gateway called “localhost" provided by Google, you can establish an extremely secure API integration environment.
Now that you have your key (token), the next article will cover building a specific workflow using this pipeline to parse Times Car reservation emails and automatically sync them to your calendar.