Building a PiKVM with Raspberry Pi 3, Pico, and a Cheap USB Capture Board – Hardware Edition
Originally, I bought a Raspberry Pi 3 to build a DIY CNC machine, but soon after, I managed to get a 3018pro CNC instead. I’ve been looking for ways to make use of the spare Raspberry Pi 3. To add to this, I also had a cheap USB capture board bought for casting to “Poppin Aladdin2" via Chromecast, and a “Pico clone" bought on impulse. Combining these parts, I took on the challenge of building a DIY PiKVM based on the official DIY v1 configuration (reference: PiKVM V1 Documentation).
Note that since it is used for monitoring an ASRock Beebox this time, the ATX controller was omitted, resulting in a simple KVM (Keyboard Video Mouse) setup.
Main Hardware Used
- Raspberry Pi 3 (DIY V1 Setup)
Effectively repurposing the spare parts originally bought for CNC building before switching to the 3018pro.
https://amzn.to/3QW2Rdn
- HDMI-USB Capture Board
A capture board purchased for Chromecast use with the Poppin Aladdin2. It captures the HDMI signal via USB and supplies video to the PiKVM. In the case of the Raspberry Pi 3, capture is performed using the bottom-right USB port, so be careful not to mix up the locations.
https://amzn.to/4hSC6RX
- Pico Clone
A board acquired through an impulse buy, utilized as the input device for the PiKVM. Official documentation and GitHub release info were also referenced.
https://amzn.to/3Y9MXjq
- Diode
While 1N5819 is often used in circuit examples, I used the SBM1045VSS I had on hand. Top: recommended, Bottom: what was used
https://amzn.to/3DZ0MdN
https://amzn.to/4cf8eOD
Wiring and Troubleshooting
When I proceeded with the build by actually combining the parts referring to “without ATX controller" in Setting up the hardware, I mistakenly wired the Pico and Raspberry Pi 3 incorrectly (reversing pins 18 and 20), which caused an error.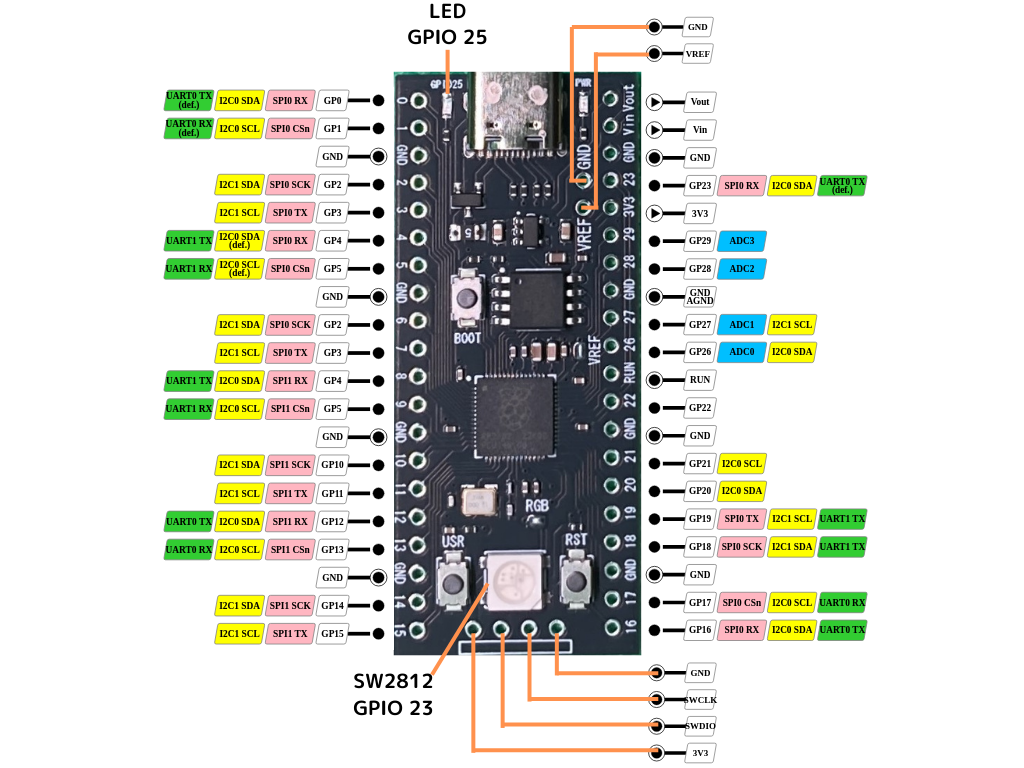
Even though the manual clearly states “Make sure to check the wiring," this is a blunder story of me being a bit careless.
After correcting the wiring to the right one, it started working properly, and I successfully completed my DIY PiKVM, bringing out the unique traits of each component.
The fact that the USB connector of the Pico clone was Type-C had no negative impact.
Key Points of This Configuration
- DIY V1 Build
Adopting the PiKVM V1 structure following the reference site https://docs.pikvm.org/v1/. - Monitoring Purpose for ASRock Beebox
Since it is used to monitor an ASRock Beebox this time, I decided that an ATX controller was unnecessary, achieving a simple configuration with the minimum required circuitry.
Conclusion
By combining a spare Raspberry Pi 3, an HDMI-USB capture board bought for Chromecast, and an impulse-bought Pico clone, the PiKVM project unexpectedly came together.
Although there was a hiccup with a wiring mistake, it was resolved by double-checking the correct connection method.
Continued in Software Edition.